
Tiny Polymer Clay Moose/ Reindeer
- Hannah G

- Nov 5, 2020
- 5 min read
Updated: Nov 27, 2020
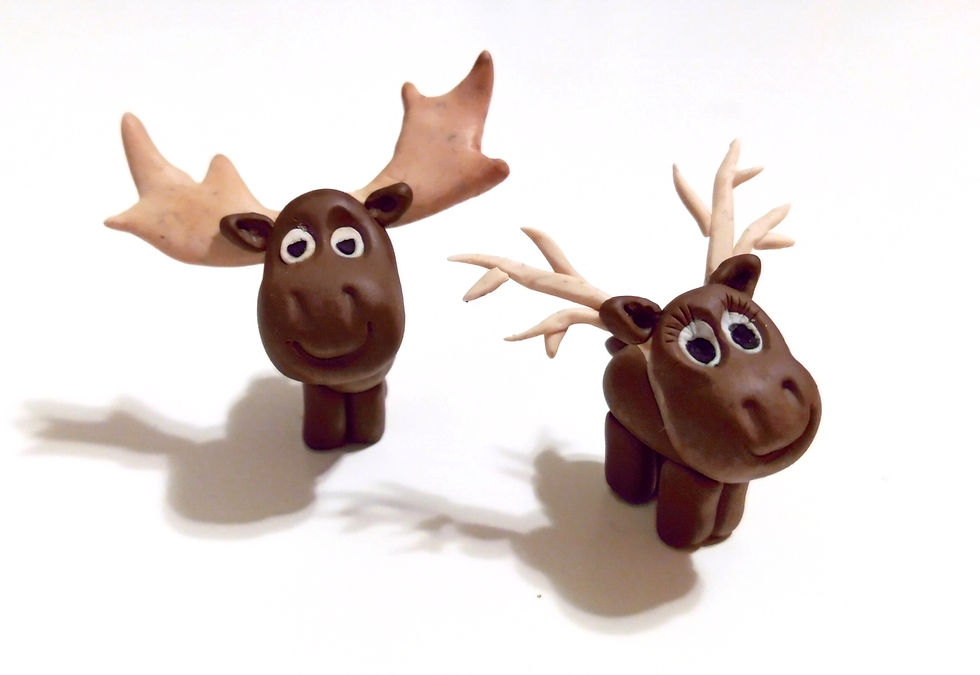
I have a lot of fun making things like this. I sneak them on to my boyfriend's desk at night for him to discover in the morning. Now that he is working from home for the foreseeable future, a bit of levity is always appreciated. These little figures are really easy to make once you get the proportions right and you can add so much character just by tweaking a few facial features.
These creations measure around 3cm length from nose to tail, 3cm height from antler to hoof and 3cm wide from antler tip to tip. They would work really well as festive table decorations, place settings or mini gifts in homemade Christmas crackers. We play a lot of board games at Christmas, so you could use these as customised playing pieces.


If you have trouble getting your figure to stand:
Play with the placement of the head - you may have to tilt it backwards to get the weight distribution right
Make the legs slightly thicker to make it more stable
Angle the front legs slightly forward to shift the weight distribution so that it can more easily bear the weight of the head
Make the teardrop shape of the body more pronounced so the back is significantly wider than the front to act as a counterbalance.
WHAT YOU WILL NEED
Brown Polymer Clay (I always use FIMO)
White Polymer Clay (FIMO again)
Black Polymer Clay (Yep, still FIMO)
Non-stick Baking Sheets
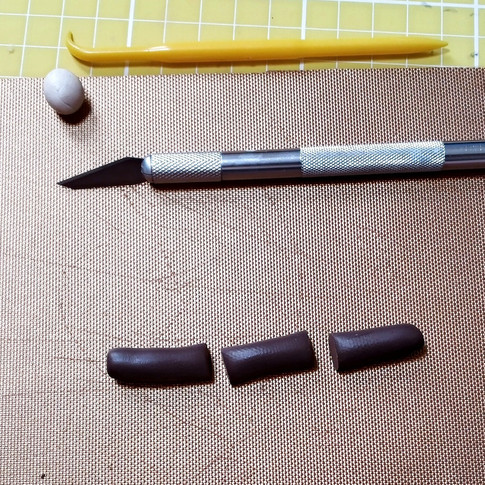
Craft Mat
Craft Blade - or a sharp, thin edged knife (not serrated)
Shaping tools - Implements for shaping polymer clay or icing craft are useful, but not essential. Feel free to improvise here because a lot of household items work just as well as purpose-made tools. With this particular project, in the absence of specific shaping tools then the humble skewer is your best friend.
1) To make the colour for the antlers, combine a small amount of brown clay with a larger amount of white clay to make a light beige colour. You will need to use your judgement here, but start with around 2mm diameter ball of brown clay with a 20mm diameter ball of white clay. If it is not dark enough for your liking, add tiny amounts of brown clay and fully incorporate it before adding more.
2) To start, take a walnut sized blob of brown polymer clay. You will have to knead the clay until it is completely pliable. Your clay may start out crumbly and look like it will never come together, but trust me that it will. This will be easier if you have warm hands, but with a bit of heat an movement the polymer clay will become smooth and pliable.
3) PROPORTIONS - Roll your clay into an even sausage and cut into three roughly equal pieces.
With the first piece, shape it into a rounded teardrop, or a stretched egg shape. This will be the body of your moose.
The second one is for the head. Shape this into a squat peanut, slightly smaller on one end.
The third piece is for legs and features but you probably will not need all of it.


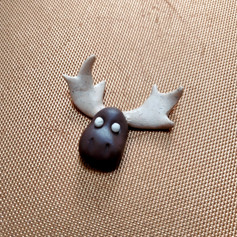
4) LEGS - Roll it into an even log around 10cm long and 1/2 a cm thick. Cut it in half and align them side by side. Make sure they touch, but do not squish them together or they will loose definition. Cut two neat 1cm lengths. Attach to the underside of the teardrop shaped body and apply two small indents at the bottom of the legs with a craft knife to indicate hooves.


5) FACE - Using a round edged implement, press hollows halfway down the peanut to create eye sockets. Press nostrils into the fat end of the peanut and give it a friendly, smiling mouth.

6) ANTLERS - For the moose style antler, roll a 1cm diameter ball into a sausage about 4cm long and cut in half. Shape each section into an oval with tapered ends. Press the middle with your finger so it flattens into an oar shape. Make some cuts along the edges and gently pull the cut sections away from the centre. Using your fingertips, gently mould into points and soften the join. Gently press the base of the antlers to the top of the head and curve the pointed tips upward to give some depth.


For the reindeer style antler, roll a 1cm diameter ball into a thin line, about 1-2mm thick. Cut small sections from the length and taper one of the ends so they are pointed and not flat. Gently press the flat ends of these together in an arrangement that resembles an antler structure, usually smaller points protruding from a centre stem. Using an implement, attach your antlers to the head piece.


7) EYES - Take two small balls of white polymer clay, no more than 2mm wide, and gently insert them into the sockets. For the pupils of the eye, take an absolutely microscopic amount of black polymer clay and gently place it on the white ball - you will find this easier if you place it with the point of your craft knife. You can always add more black if need be, but it is incredibly difficult to remove if you add too much. Using the rounded tool (or very gently with your fingertip) press the eyes into the hollows. This may take practice to get the pressure right so that the colours merge neatly without getting smudged when pressed.


If you want to add an eyelash detail, make gentle impressions around the eye with your craft knife. Do not attempt to attach the head to the body at this stage!
8) TAIL AND EARS - Next, take some of the left over dough from making the legs. Roll two small ovals around 2mm long and press a conical pointed implement (or a skewer works) three quarters of the way into the balls. Remove the implement and delicately press the split end together. Attach this to moose head just in front of the antlers. Make sure you are careful not to squish the antlers out of shape when you attach them.
For the tail, roll an oval around 3mm long and apply the same technique as for the ears.


9) Bake the separate body and head in the oven for 10 minutes on a low heat.


10) Remove the clay from the oven but do not turn it off yet. Allow the figures to cool for a few minutes and then use a 2mm ball of clay to glue the head to the body. You may have to manipulate the angle and placement of the head so that the model stands. If it cannot stand when it goes back in to the oven, it will not stand when it comes out. When you are happy with it, carefully put it back in the oven for another 5 minutes. When cooled, your creatures are finished!


Comments