
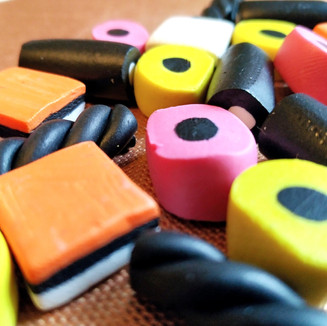
Polymer Clay Liquorice Allsort Charms
- Hannah G

- Nov 26, 2020
- 7 min read
These little polymer clay charms are fun to make and can be useful in allsorts of wonderful craft projects!

Great for making...
Jewellery
Small drawer handles
Fun bathroom light pull ornamental handles
Edging for mirrors and picture frames
Fridge magnets
Keyrings
Creative decorative endeavours
Some of these things will require forward planning, as any holes for screws and threading will need to be made before they are baked. The good thing is that polymer clay retains its shape and colour almost perfectly when baked, so how it looks when it goes into the oven is how it will look when it comes out.


A few key things to remember before you begin:
You must work your polymer clay well to make it pliable before you begin. If you skip this part, the polymer clay is likely to be grainy and brittle.
Warm polymer clay is softer than cold polymer clay. If you need to shape or texture it, warm it up between your palms, or if you are really struggling, try blasts of a hair dryer. If you need to add clean holes for fittings or screws and are worried about squishing it out of shape, put the clay creations in the freezer for a few minutes to firm up.
Black polymer clay is the bane of my existence - it takes more working to make it soft and transfers colour to everything it comes into contact with. This includes your hands and the worksurface. It is VITAL that you take the time to thoroughly wash your hands with something exfoliating or a sponge because soap alone will not work. Hand sanitiser works well at lifting grease so is excellent for this.
White polymer clay will drive you insane - it is almost impossible to keep entirely pristine and you will probably utter a few curses before the project is through. If possible, use a completely different surface or craft mat to isolate it from other colours.
Details matter. Ultimately, these are incredibly simple designs, so precision is important. Try to make the colours accurate and ensure that you get clean, precise edges and slices.
They do not need to be perfect! Firstly, if you look at a real bag of liquorice allsorts, they are all slightly different shapes and sizes with scuffs and chips, so really you are just making them more authentic. Secondly, this is supposed to fun so don't add needless pressure. Imperfections are just part and parcel of hand-made small batch creations; it does not make the end result any less satisfying.
WHAT YOU WILL NEED
FIMO White Polymer Clay
FIMO Black Polymer Clay
FIMO Orange Polymer Clay
FIMO Pink Polymer Clay
FIMO Yellow Polymer Clay
Craft Mat (preferably with a printed grid for measuring)
Baking sheet/ Baking paper
Craft Knife
Rolling Pin (NOT one you use for food - you can improvise one from a glass bottle if need be)
*Jewellery fittings, screws, FIMO Gloss Varnish, Gorilla Superglue Gel, etc. depending on your intended use.
These directions assume that the polymer clay has already been made pliable by kneading before beginning.
Liquorice Twists
Roll a 3cm diameter ball into a thin sausage around 3-4mm thick. You may need to break the ball into several pieces to achieve this evenly.

Cut three even lengths around 6cm long and align them in a pyramid with two touching at the bottom and one resting on top between the two. Do not squish them together. Gently take the ends of the three strands and twist them so that they resemble rope cord.

Neatly cut the twisted rope into three even pieces with a craft knife. Repeat the process until you have as many as you want. Place them gently on a heatproof baking sheet.

Coconut Rolls
Roll a 3cm diameter black ball into a sausage around 1cm thick.

Take a 5cm diameter ball of yellow or pink polymer clay and roughly shape it into an oblong and roll it to around 1cm thick, 3.5cm wide (so that it fits around the circumference of the black clay) and as long as it gets. Wrap the coloured clay around the black core so that the long edges meet.
Gently press the edges together and roll it slightly to ensure the seams are well hidden and the layers adhere properly.
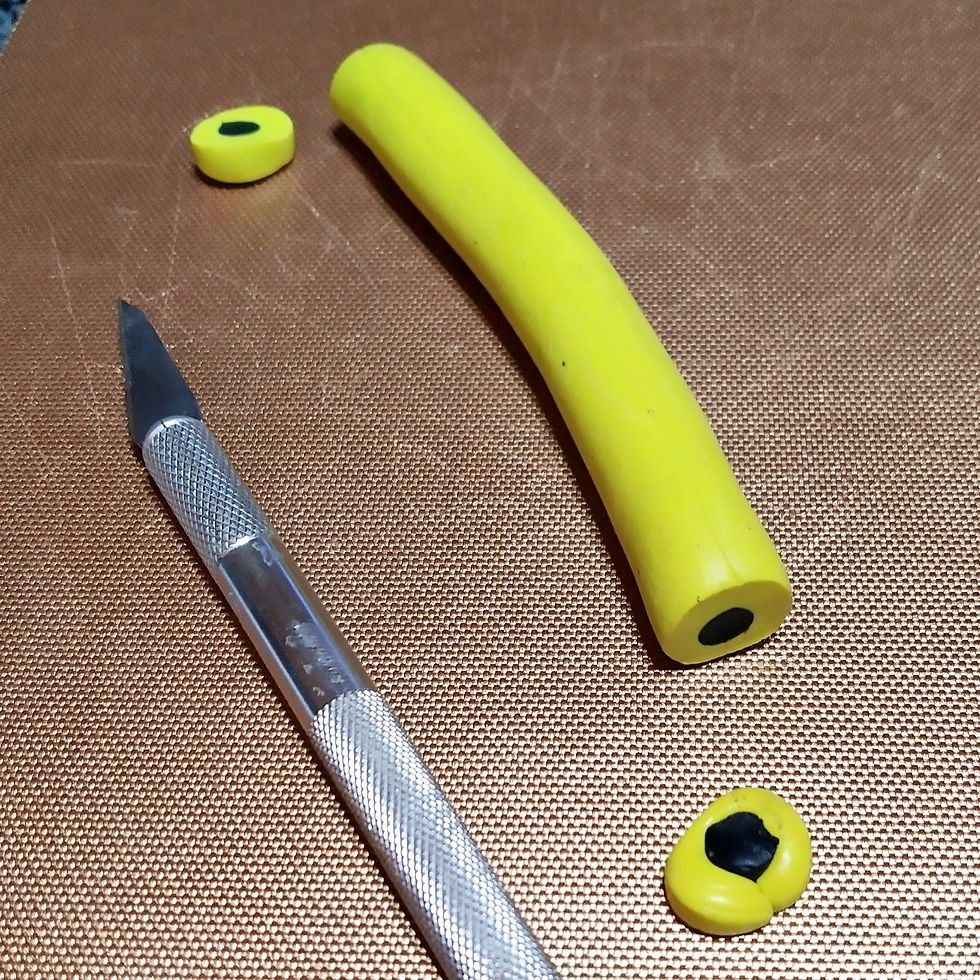
Continue gently rolling and evenly stretching it slowly until it is around 1.5cm thick depending on how large you want them.
Line up the sausage against the grid on your craft mat, lop off the messy ends and keep them to one side. Cut slices around 5-7mm thick. Lay them onto a baking sheet.


Liquorice Tube
A similar process to the Coconut Rolls but inverted. You will need to roll a rectangle of black clay to enclose around a white cylinder.
On a clean surface with clean hands, roll a 3cm diameter ball of white polymer clay into a sausage around 1cm thick.
Mould a 3cm diameter ball of black polymer clay into rough rectangle and roll it to around 3-5mm thick, 3.5cm wide and as long as it ends up.
Wrap the black around the white centre and press the seams together. Roll the two-toned sausage to blend the edges and make sure it is an even thickness of roughly 1cm. Take off the ends and keep them to one side. Cleanly cut the tube into 2cm lengths, taking care to keep the slices straight.
Place them individually on to a baking mat with the other liquorice allsorts.

Layered Liquorice Squares
This requires by far the most precision of the four designs. The trickiest part of this is keeping the flat white surface unblemished, so take care to roll the white on a different surface to the black and only bring them together when the pieces are ready to layer.
You will need three 3cm diameter blobs each of black, white and orange polymer clay.
Take a ball and shape it into a chunky square. Use the edge of the rolling pin or the surface of the craft mat to get fairly straight edges. Roll the clay trying to maintain the square shape. You are aiming for around 3mm thick and will need to pick up and move the square from time to time to make sure it does not stick to the surface. If you have trouble, try rolling it between two pieces of cling film.
Leave this to one side and do the same with the other balls of clay. Try to make sure they are roughly the same size since this makes layering easier and creates less wastage, but they do not need to be completely perfect.

The square sheets should be arranged so that the black 'liquorice' is in the middle. If you have ever put a screen protector on your phone then you will recognise the technique used here! On top of either the white or orange slab, carefully line up the bottom two corners with the black. Once they touch, it will be difficult to move it so take your time and be precise.
With the side of your hand, press the two layers together and firmly sweep upwards pressing the slabs together as you go. This ensures that there will be no air bubbles. Air between the layers will impact on the final look of the allsort but can also mean that the layers will not stick together properly. Repeat this for the top layer also. If the combined layers are too thick, gently roll it thinner.
Line up your now three layered, roughly square shaped slab with the grid on your craft mat. Trim the edges of the square so that all of the messy overhang is removed and the corners are crisp. Keep these scraps to one side. Now you will need to make clean, confident, firm slices straight through the slab to make smaller liquorice squares. I made my square allsorts approximately 1.3cm, but feel free to choose a more sensible number that works for whatever size your slab is. Gently separate your small squares from each other using the tip of the craft knife (to avoid uncrisping all of your crisp edges with warm, smudgy hands) and move them to a baking sheet.


Baking
Make sure you have made any holes that need to be done for fittings and attachments before they go in the oven.
Bake in an oven set to the lowest temperature possible. These should not take more than 10 minutes. Do not leave them in longer than stated in case they scorch! White polymer clay is particularly unforgiving in that way. If when they have cooled a bit they still feel soft or overly rubbery, pop them back in the oven for another 5 minutes.
Finishing
Make sure they are completely cool before moving on to the next stage.
If there are slight blemishes like lint or colour smudges, you can gently scrape the surface of the polymer clay charm with the craft knife to remove the top layer without impacting on the integrity of the creation.
I chose not to glaze these because I think the matte, slightly textured finish is more realistic, but if you want them glossy then I recommend FIMO Gloss Varnish.
For attaching small metal jewellery fittings, a flexible superglue works well. I use Gorilla Superglue Gel for things like earrings, necklace pendants and securing screw eye bails.
So... what do you do with the colourful scraps you kept to one side?
I rolled mine into a sausage being careful to keep the colours distinct and avoid blending them together. If you mix them, I can almost guarantee the result would not be pretty. I rolled the sausage to around 1cm thick and then made roughly 3-5mm slices through the cross-section. These slices had a jazzy, vibrant, almost graffiti or animal print vibe about them that looked really awesome, and the best bit was that they were all slightly different.

These bake in less than 10 minutes. Do not leave them in for longer or they may scorch. I made some of these into asymmetrical stud earrings and others I will use to decorate the corners of a photo frame.


Comments