
Dried Orange Slices
- Hannah G

- Nov 13, 2020
- 3 min read
These are really easy and I make them every year to decorate my Christmas tree. All you need is a sharp knife, some oranges and a lot of patience. These make gorgeous tree decorations because they act like stained glass windows when you put them in front of fairy lights. These slices can also be used to garnish mulled wine or fruit punch. Using the same technique with limes, lemons and grapefruits would make fabulous garnishes for gin and tonic.


This will probably take you all day, so make sure you have the time to dedicate to dehydrating orange slices before you begin. This is a slow process, but you should start seeing it working fairly quickly. If you have a good oven and you trust it to maintain a low enough temperature to dry them out without burning them, this will be a very straightforward and painless project. If, like me, you have an unreliable oven (ours actually defies the laws of thermodynamics and grills from below) then you will have to reconcile yourself to the prospect of hovering near the kitchen all day. I usually do these when I have a lot of food preparation to do, such as making bread dough and preparing a Sunday roast. I can just leave them drying in the background but be near enough to make sure my oven does not get too hot.
If you have trouble getting your oven temperature low enough, try leaving the oven open a crack as if you were cooling a pavlova. Be patient and do not be tempted to raise the temperate to speed the process along because you will only end up burning your orange slices.
THINGS YOU WILL NEED
Sharp Knife
Oranges
Clean Tea Towel
Baking Sheet/ Greaseproof Paper
Baking Tray
1) Find the sharpest knife you have with the thinnest blade. I used a filleting knife for this because I gets incredibly thin and whole slices. Please be ridiculously careful when doing this! Do not rush and try to slice your oranges without distractions because you could seriously injure yourself. Ban your family from the room for half an hour if you have to, but you do not want people moving about and distracting you.


Try to get your slices as thin and even as possible. It is unlikely that every slice you make will be perfect, but bear with it because the imperfect ones will still make brilliant garnishes even if they don't make the cut to become decorations.
2) Lay the slices out on a clean tea towel and leave them for 12 hours or overnight. They should then be mostly dry to the touch on their outside layer, the zest will have started tightening and the individual juice sacks inside the segments will look more defined. If you do not want to leave them overnight then you can skip this step, but from my experience they seem to be more prone to burning and dry more unevenly.


3) Set the oven to the lowest temperature possible. Carefully transfer the orange slices to a non-stick baking sheet. The baking sheet/ grease-proof baking paper is really important here - do not put them directly onto a baking tray and make sure the slices do not overlap because they will stick fast and be impossible to remove neatly.
4) Dry the slices for as long as they need, flipping them several times and moving them to avoid scorching when needed. I cannot give you a precise time, but a thin slice may need 3-4 hours an a thick slice could need 6-8. The slices will probably be ready at different times, so make sure you check them regularly and pull them out when they are done.
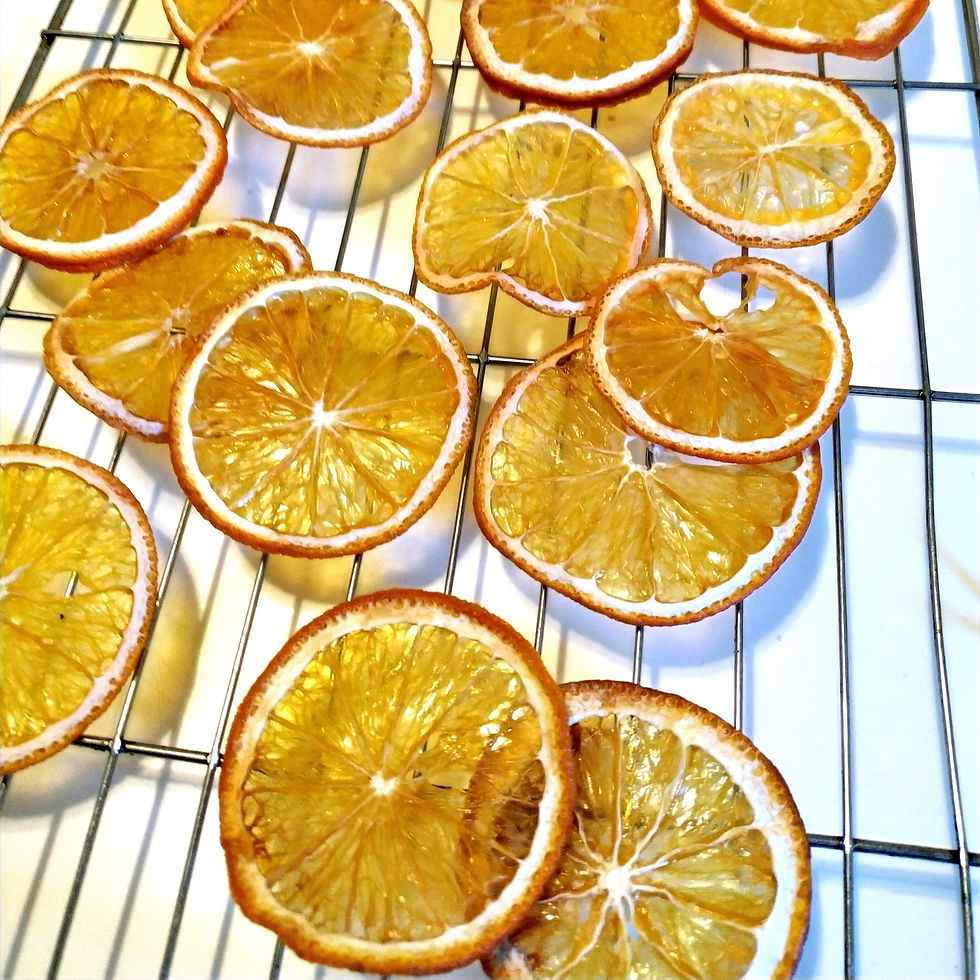
The slices are ready when the skin is hard and the segments are completely translucent like a stained glass window. It should feel like a thin membrane and not be wet to touch, although it may be soft and slightly tacky until it cools.
5) If using them for food and drinks, store them in an airtight container until needed. If making them into decorations, carefully pierce a small hole in the segment membrane near the rind and gently thread string through to make them into a garland or tree decoration.


Comments