
Salt Dough Autumn Leaves
- Hannah G

- Nov 3, 2020
- 8 min read

Originally, I just wanted to make these because I absolutely adore the gold and red tones of turning leaves in the autumn. Unfortunately, real leaves quickly loose their bright shades and either crumble into dust or rot in a puddle. I wanted to create something realistic enough to capture the natural beauty of the fallen leaves, but also something that I could keep all year round. Although these started out as nothing more than an ode to autumn, the longer I worked on these, the more uses I found for them. Here are the ones I have identified so far:
Decorative Autumn Leaves - They are very pretty. I am completely in favour of these being hung all over the place regardless of season. There is nothing wrong with surrounding yourself with things that are nice to look at!
Scented Air Freshener - They take on essential oils really well and can be quite fragrant when placed somewhere warm. I brushed the backs of some of my leaves with a few coats of scented oils, such as sandalwood, cinnamon and lavender. I gifted one of them to my boyfriend's car and have placed others in strategic locations around the house.
Potpourri - For an interesting and very pretty bowl of potpourri, assemble some leaves in a bowl with cinnamon sticks, whole star anise, and dried oranges. Sprinkle liberally with scented oils and leave somewhere dry and warm. The scented oils will need to be topped up every few weeks or so to keep it fresh.
Seasonal Garland - Space them evenly across a piece of twine and hang them like nature-inspired bunting.
Gift Tags - I am definitely using these for birthday gifts in the future! Only the front of the leaves are textured, so it would be very easy to paint the back a light colour and use a sharpie to write on it as you would any gift tag. They would also be cute to identify the contents of a bottle or mason jar.
Wreath Making - After some experimentation, I discovered that you can embed wire into them so that they are pliable for shaping into a wreath.
Tree Ornaments - Every year, my family has a tinsel-free Christmas tree. Do not take this to mean that our tree is in any way boring, because it is actually one of the busiest designs you will ever see and it is truly amazing. In addition to some eclectic sentimental ornaments, our tree gets absolutely covered in birds, mushrooms, berries, acorns, pinecones and all things woodland. This year, I certainly intend to add some gilded leaves to the mix in a harmonious blending of the seasons.
Harvesting Leaves
This was the most fun bit for me. When the air is crisp and there are those lovely fluffy clouds in the sky with shards of blue desperately trying to peek through, wrap up warm and go for an amble. Head to a park or woodland where you are sure to find plenty of trees and then all you need to do is keep your eyes open. If you are organised, you will have brought a bag with you to hold your harvested leaves. But if you are like me, then you are not organised and instead will spend the next hour walking about with armfuls of colourful, damp leaves like an overexcited child.


^ These are photos I have genuinely sent my boyfriend while out leaf harvesting.
I wholly recommend claiming any leaf that inspires you, but practically speaking you should look for leaves that are:
freshly fallen (there are plenty to choose from so please don't go pulling them off trees unnecessarily)
in one whole piece (preferably without rips or tears)
with a prominent vein structure (feel the underside of the leaf for clearly defined ridges)
The last point is by far the most important for the purposes of this project. We will be using the leaves to emboss an impression into the salt dough, so the more pronounced the vein structure in the leaf, the more impressive the end result will be.
Colouring the leaves
There is nothing stopping you from using paints for this, but I chose to make some rudimentary watercolours from my kitchen cupboard. There were two reasons for this. Firstly, I did not have any suitable paints in my home and honestly, it never even crossed my mind to go and get some.* Secondly, the object of this exercise was to mimic the natural colourings within the leaves, so what could be better than using actual bits of dried plant? I only used three 'paint' colours and finished with a smattering of gold lustre dust to achieve this effect on my leaves and I am very pleased with how they turned out:
Brown - I steeped a teabag in no more than 50ml of hot water and waited until it was cool. I used this as a first coat on the leaves, since the tea settles into the cracks of the leaf veins and highlights the texture well.
Yellow - For this I used our trusty friend turmeric. About a teaspoon of turmeric was mixed with 30ml of hot water and left to cool.
Red - This was made with 1 teaspoon of chilli powder and 30ml hot water. A wonderfully vibrant chilli powder, not one that has spent so long in the back of the cupboard that it has gone dull. In the absence of chilli powder I am sure any red powder would work, such as paprika or cayenne pepper.
(*Having said that, a few days after making the leaves I stumbled across some gold acrylic paint in one of my craft boxes and used it to finish off the edges of my leaves. It really makes them pop, but this step is completely optional.)
Be prepared to take your time when painting the leaves. I used a watercolour technique because the way the liquid pools and dries helps to emphasise the embossing of the leaf. However, it will take time to get depth of colour into the leaf and this is achieved through building up layers. After each layer, the salt dough leaf needs to dry thoroughly before the next one is applied. This is to prevent the dough from becoming soggy and losing definition. Some of the leaves may curl at the edges slightly as they dry, but I just think this makes them look more realistically leafy.
THINGS YOU NEED
Beautiful autumn leaves
Baking paper/ reusable baking sheets
Rolling pin
Sharp knife
Skewer
Fine paintbrush, around 5mm
Teabag
Turmeric
Chilli powder (or similar)
Gold Lustre Dust
Ball of twine
*optional Flower craft wire if you intend the leaves for wreath making
**optional scented oils if you intend to fragrance your leaves
***optional gold acrylic paint
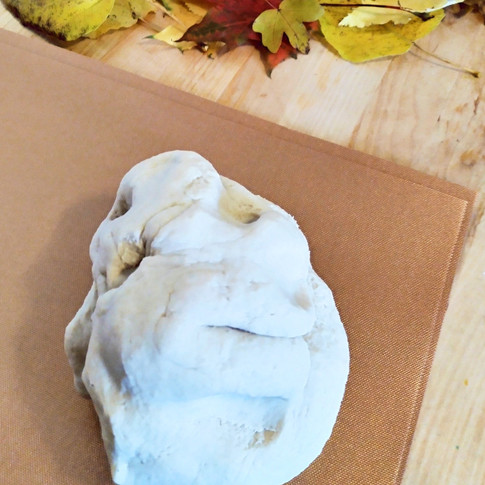
1) Once you have made your salt dough, roll out a handful of dough on to grease proof baking paper or a reusable baking sheet to prevent it from sticking to the surface. If you want thinner, daintier leaves, roll the dough to a thickness of around 1 - 2mm. If you want more robust leaves, roll them 3 - 4 mm.
*If you plan on embedding wire into the leaves, you will have to use thick dough.


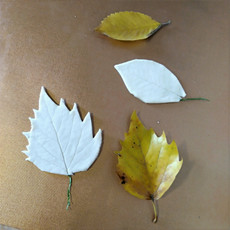
2) Place the leaf you want to replicate face side up with the veiny underside against the dough. Using a rolling pin, firmly press the leaf into the dough. Make sure you roll enough to get a good impression, but not so hard that the leaf submerges into the dough and it becomes impossible to remove.


* If you are embedding wire, cut a 20cm length of florist wire. Fold it in half and place the folded end under the dough about 5cm in. Align the wire in the same direction as the leaf stem, then roll the leaf into the dough.
3) With a sharp knife, cut around the edge of the leaf. When you get to the stem, leave a square at the base of the leaf and use a skewer to make a neat hole for hanging.


4) Since these the leaves have already been made onto baking paper, slide them straight onto a baking tray. Do not bother trying to move them at this point since you just risk smudging the edges and leaf texture. Heat the oven to the lowest temperature possible and put them in to bake. The leaves will need at least an hour to bake, but ultimately they will take as long as they need and cannot be rushed. If you raise the temperature, the dough may bubble and you could lose the leaf impressions. If your dough starts to bubble, just turn the oven off and allow it to cool slightly before turning it back on again.
After about half an hour the leaves will still be soft, but will be dry to touch. Now you can gently lift the salt dough leaves and rearrange them if you need to make more space. You will need to do this if you are making multiple batches like me.

5) When the leaves are completely crisp, take them out of the oven. While the leaves are cooling, prepare your 'paints'. Assemble 3 cups and put a teabag in one, 1 teaspoon of turmeric in another and 1 teaspoon of chilli powder in the third. Pour a glug of hot water (around 30ml) over the turmeric and chilli powders and slightly more than a glug (around 50ml) on the teabag. Leave the watercolours to cool completely.
6) Now you can start to colour your leaves. Use a fine paintbrush to apply and make sure you dry the leaves completely between layers. If you are making a lot of leaves in one go (I had about 24 in this batch), you might be lucky enough to find that by the time you reach the final leaf, the first leaf is already dry.
I started all of my leaves with between one and three coats of tea. The tea settles in the veins and makes them nice and dark so they stand out.


Then I applied big splodges of colour. Because these are watercolour style colours, you cannot be too precise and they work better when they are just allowed to settle wherever they feel like it. Try to make every leaf different. Maybe focus on colouring the pointy tips of one leaf red, the centre line of the leaf yellow, or make either half of the leaf different colours.

For you final layer, work on blending your splodges together so that they are more seamless.
7) Be patient and layer as many times as you think necessary. Some of my lighter leaves only had 4 layers of colour, but my deeper toned leaves had up to 10. Once the leaves were completely dry and I was happy with the colours, it was time for the gold lustre dust. I wanted an irregular layer that almost resembled aged and flaking gold leaf, so I just tipped the dust onto a baking mat and applied it with my fingertip in rough swipes.


**If you are applying scented oils to your leaves, now is the time. Brush a thin layer of your chosen oil on to the BACK of the leaf. Applying it to the front will ruin all of your hard work. I experimented with adding a layer of oil to the front of the leaf before it was painted, but the when the oils dried they created a water resistant surface so that I was unable to apply watercolours. Depending on the potency of your chosen oil, you may want to do multiple coats before you are happy with the result.
***If you wish to finish the edging of the leaf with gold acrylic paint, apply small amounts at a time with the tip of a fine paintbrush. This will help to give you a crisp finish that does not bleed onto the front face of the leaf.
8) Your leaves are almost finished! Cut some lengths of twine and feed them through the holes so that you can hang them, or tie lots of leaves in to a length of twine to create a seasonal garland.


Comments